In SAP HANA, there are several trace files that can be important for debugging and troubleshooting performance issues. Some of the most important trace files are:
Indexserver trace file: This trace file contains information about the indexserver process, including queries, table operations, and errors. The indexserver trace file is located in the trace directory of the HANA instance and is named as indexserver_<pid>.trc.
Nameserver trace file: This trace file contains information about the nameserver process, including network connections, system status, and errors. The nameserver trace file is located in the trace directory of the HANA instance and is named as nameserver_<pid>.trc.
XS Engine trace file: This trace file contains information about the SAP HANA Extended Application Services (XS) engine, including HTTP requests, server-side JavaScript, and errors. The XS engine trace file is located in the work directory of the HANA instance and is named as xsengine_<pid>.trc.
Alert trace file: This trace file contains information about the alerts and alarms generated by the SAP HANA system, including performance thresholds and system errors. The alert trace file is located in the trace directory of the HANA instance and is named as alert_<pid>.trc.
It’s important to note that the exact location and names of the trace files may vary depending on the specific configuration and version of your SAP HANA system. You can also refer to the SAP HANA Administration Guide for more information on the trace files in SAP HANA.
The gsutil cp command allows you to copy data between your local file system and the cloud, within the cloud, and between cloud storage providers. For example, to upload all text files from the local directory to a bucket, you can run:
gsutil cp *.txt gs://my-bucket
You can also download data from a bucket. The following command downloads all text files from the top-level of a bucket to your current directory:
gsutil cp gs://my-bucket/*.txt .
You can use the -n option to prevent overwriting the content of existing files. The following example downloads text files from a bucket without clobbering the data in your directory:
gsutil cp -n gs://my-bucket/*.txt .
Use the -r option to copy an entire directory tree. For example, to upload the directory tree dir:
gsutil cp -r dir gs://my-bucket
If you have a large number of files to transfer, you can perform a parallel multi-threaded/multi-processing copy using the top-level gsutil -m option (see gsutil help options):
gsutil -m cp -r dir gs://my-bucket
You can use the -I option with stdin to specify a list of URLs to copy, one per line. This allows you to use gsutil in a pipeline to upload or download objects as generated by a program:
cat filelist | gsutil -m cp -I gs://my-bucket
or:
cat filelist | gsutil -m cp -I ./download_dir
where the output of cat filelist is a list of files, cloud URLs, and wildcards of files and cloud URLs.
Copying To/From Subdirectories; Distributing Transfers Across Machines
You can use gsutil to copy to and from subdirectories by using a command like this:
gsutil cp -r dir gs://my-bucket/data
This causes dir and all of its files and nested subdirectories to be copied under the specified destination, resulting in objects with names like gs://my-bucket/data/dir/a/b/c. Similarly, you can download from bucket subdirectories using the following command:
gsutil cp -r gs://my-bucket/data dir
This causes everything nested under gs://my-bucket/data to be downloaded into dir, resulting in files with names like dir/data/a/b/c.
Copying subdirectories is useful if you want to add data to an existing bucket directory structure over time. It’s also useful if you want to parallelize uploads and downloads across multiple machines (potentially reducing overall transfer time compared with running gsutil -m cp on one machine). For example, if your bucket contains this structure:
gs://my-bucket/data/result_set_01/
gs://my-bucket/data/result_set_02/
...
gs://my-bucket/data/result_set_99/
you can perform concurrent downloads across 3 machines by running these commands on each machine, respectively:


gsutil -m cp -r gs://my-bucket/data/result_set_[0-3]* dir
gsutil -m cp -r gs://my-bucket/data/result_set_[4-6]* dir
gsutil -m cp -r gs://my-bucket/data/result_set_[7-9]* dir
Note that dir could be a local directory on each machine, or a directory mounted off of a shared file server. The performance of the latter depends on several factors, so we recommend experimenting to find out what works best for your computing environment

Copying In The Cloud And Metadata Preservation
When copying in the cloud, if the destination bucket has Object Versioning enabled, by default gsutil cp copies only live versions of the source object. For example, the following command causes only the single live version of gs://bucket1/obj to be copied to gs://bucket2, even if there are noncurrent versions of gs://bucket1/obj:


gsutil cp gs://bucket1/obj gs://bucket2
To also copy noncurrent versions, use the -A flag:


gsutil cp -A gs://bucket1/obj gs://bucket2
The top-level gsutil -m flag is not allowed when using the cp -A flag.
HANA’s EXPORT command exports the objects defined in the command and all other row-stored tables, views, functions, stored procedures or synonyms for these objects which are referenced in the defined objects.
The following sections describe the export and import steps and in the examples the SBO company schema is called SBODEMOUS. For a more detailed description you can consult with the export and import process described by SAP.
EXPORT "SBODEMOUS"."*" AS BINARY INTO '/usr/sap/HDB/HDB00/work/backups/SBODEMOUS' WITH REPLACE THREADS 8
The number of THREADS should not be more than the actual number of cpu cores in the server. It is recommended to leave at least 2 cores for other tasks so if you have 10 cores, you should use THREADS 8.
If you do the export and import during working hours and your server is quite busy, it is recommended to consider using less THREADS. This way the export and import will take more time, but there will be less chance of timeout and deadlock problems because of this.
The path in the commands depends on the configuration of the actual server. The target folders should exist and be empty. The path works with the group ‘sapsys’, owner ‘hdbadm’ and default rights 755. If any of these are different, it can cause errors during the export and import.
If the export is successful, the path will contain an ‘export’ and an ‘index’ folder. Under the ‘export’ and ‘index’ folders there will be the folder(s) of the schema(s).
The ‘export’ folder in the ‘/usr/sap/HDB/HDB00/work/backups/SBODEMOUS’ folder should contain the SBODEMOUS folder.
2. Compress the folders if you need to move or backup them:
cd /usr/sap/HDB/HDB00/work/backups/SBODEMOUS
tar -cvzf sbodemous.tar.gz SBODEMOUS
In this example we will import a copy of the SBODEMOUS schema and rename it during the import process. The new schema that will be imported in this example will be called SBODEMOUS_COPY.
1. Copy the exported archives onto the target server.
2. Extract the archives:
cd /usr/sap/HDB/HDB00/work/backups/SBODEMOUS
tar -zxvf sbodemous.tar.gz
3. To rule out the possible errors that can result from overwriting the schemas, make sure that before the import you delete SBODEMOUS_COPY schema with cascade if it exists.
4. In the IMPORT command, you have the possibility to rename schemas. You should use this to avoid any additional schema to be overwritten, other than the schema you actually want to import. For this reason, you should check in the exported “export” and “index” folders if any other schema is referenced. Then in the IMPORT commands, make sure that every referenced schema is renamed.
5. Import the SBODEMOUS schema:
IMPORT "SBODEMOUS"."*" AS BINARY FROM '/usr/sap/HDB/HDB00/work/backups/SBODEMOUS' WITH REPLACE THREADS 8 RENAME SCHEMA "SBODEMOUS" TO "SBODEMOUS_COPY", "SBOCOMMON" TO "SBOCOMMON_TEMP"
6. Delete all the *_TEMP schemas with cascade if they have been created.
7. After the import it can happen that the SBO_SP_TRANSACTIONNOTIFICATION does not exist in the SBODEMOUS_COPY. In this case it should be created again from the backup you created before the export. If the SBO_SP_TRANSACTIONNOTIFICATION is missing, you will be informed about it in a message when you log in to SBO and you will get a “The transaction has aborted.” error during the PMX Database Update.
8. Run the PMX Database Update Tool and execute an update with the correct connection string.
This will create the deleted PMX stored procedures. Please note that the PMX_SP_TransactionNotification stored procuredure is only created if the Force to re-install PMX_SP_TransactionNotification checkbox is checked.
9. The PMX_SP_TransactionNotification can contain custom code. In this case we recommend re-creating it manually from a backup instead of adding it automatically by enabling the checkbox.
10. Now you can re-enable the call for PMX_SP_TransactionNotification in SBO_SP_TRANSACTIONNOTIFICATION.
Import into the Schema with the Same Name
If you want to import into the schema with the same name as the export was executed for, you should omit the whole RENAME section in the command above.
2. Using the Export/Import Wizard in SAP HANA Studio
The following section describes the steps of using the Export and Import Wizard in SAP HANA Studio. In the examples below the SBO company is called SBODEMOUS.
2.1. Using the Export Wizard in SAP HANA Studio
1. Select the Export… menu item.
2. Click Next.
3. Specify the Directory for the export. 4. Set the number of threads. 5. Click Finish.
2.2. Using the Import Wizard in SAP HANA Studio
1. Select the Import… menu item.
2. Specify the Directory where the exported items can be found. 3. Click Next.
4. Select all the items on the left side as follows. Click on the first item, press <Ctrl>-<A> and click Add.
5. Now all the items appear on the right side as well. Click Next.
6. Check in the Replace existing catalog object option. 7. Set the number of threads. 8. Click Finish.
To unlock the SAP system, enter the following commands. The system may be either the original SAP system or the shadow system, depending on which one the error occurred.
Original SAP system cd /<update directory>/abap/bin ./SAPup unlocksys
Shadow system cd /<update directory>/abap/bin SAPup unlockshd
Log on to the SAP system or shadow system and correct the error.
To lock the original SAP system or shadow system again, enter the following commands:
Original SAP system cd /<update directory>/abap/bin ./SAPup locksys
Shadow system cd /<update directory>/abap/bin SAPup lockshd
Ref:1901463 – How to unlock the SAP system to perform correction(s) during an upgrade.
1. Logon on to client 000 of new refreshed system with DDIC. 2. Validate that user TMSADM is a system user type. If not, change it to system user. SE06 1. Select the Database Copy or migration option 2. Press the Post-installation Processing button. 3. When prompted Do you want to re-install the CTS?, press the Yes button 4. When prompted for the Source System of Database Copy?, make sure that the of the source system is selected. Press the checkmark button to continue. 5. When prompted Change originals from PRD to QUA?, press the Yes button 6. When prompted Delete TMS Configuration?, press the Yes button 7. When prompted Delete old TMS configuration?, press the Yes button 8. When prompted Delete Old Versions of transport routes?, press the No button
TMS Configuration
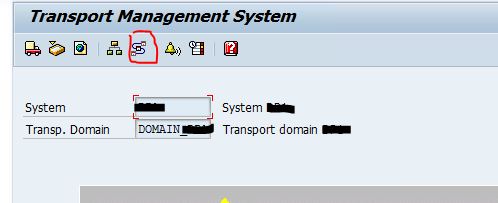
1. Logon on to client 000 of the newly refreshed system. STMS 1. Upon starting STMS, a window with the title TMS: Include System in Transport Domain should be displayed 2. The information on this screen is automatically filled out from information provided during the SAP installation and should be correct. If it is correct, then enter a description for the system and press +S to save. Otherwise, press the Other configuration button and manually configure. 1. From the Overview menu, select Transport Routes 2. From the Configuration menu, select Adjust with Controller 3. Press the Yes button when prompted if you want copy the transport routes from the controller.
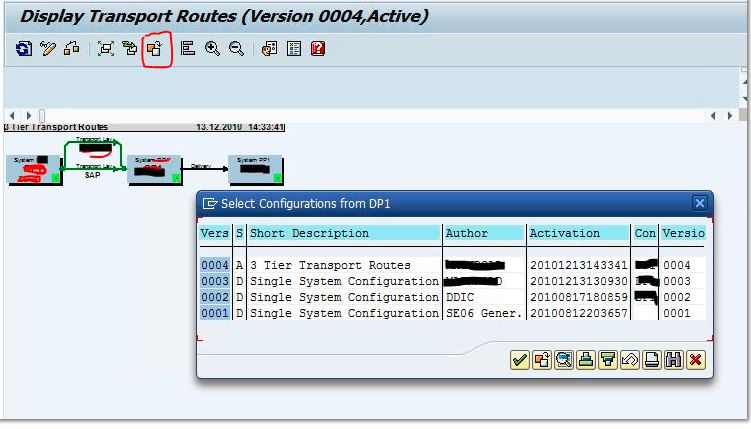
Each time you do a change and save it, a versions of your STMS configuration is saved.
You can go back directly to a previous version that wroked fine by doing this:
STMS – -> Transport_Routes
Get_Other_Version
Then you can choose the version it worked fine before. (you can get there by activation date).
DB Refresh using HANA Studio DB Restore with SID Modification – NON SAPinst
HANA Studios DB restore option and hdbuserstore there after makes the whole process of a System copy a lot simpler . The only limitation would be that the target schema would still remain as source.
These are the salient steps involved in achieving this
Step 1 ) Take a complete DB backup of the source Database
Step 2) Move the database backup to the Target system
Step 3) Using HANA Studio recover the source db in the target HANA box
Step 4) Supply the license text so that the HANA Studio can automatically apply the license after install
Step 5) Modification of Schema access at the target DB
Step 6) Modify the default key using the hdbuserstore on the application servers and DB instance.
HANA LOG and TRACE files are located under /usr/sap/< SID >/HDB< Instance number >/< hostname >/tracedirectory. If you are using multitenant structure, then this directory shows SYSTEMDB and you can find TENANT logs and trace files under own directory (DB_SID).
You can find the LOG & TRACE directory location via following SQL query ;
SELECT * FROM M_DISKS WHERE USAGE_TYPE = ‘TRACE’ ;
On OS level you can list the related log files ;
Also you can check the trace files like below ;
After logon as “<SID>adm” user you can directly go to trace/log directory easily with “cdtrace” command ;
For tenant DB log and trace files, we need to go to under related “DB_<SID>” directory