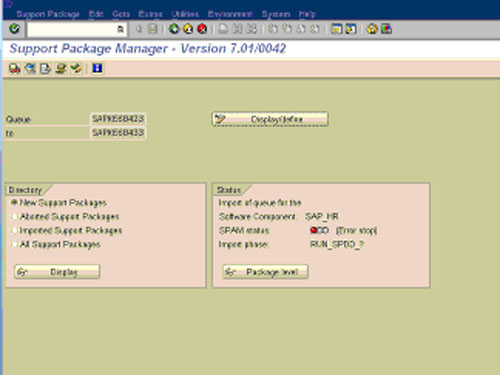
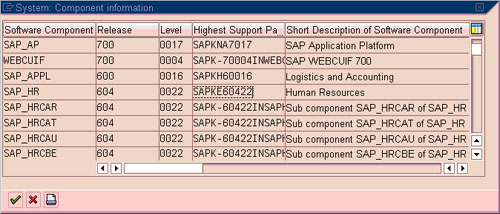
Object R3TR is in repair status. Therefore, it cannot be imported

You are doing support packs upgrade (import queue) but ended with below error,

Capture.JPG

Solution

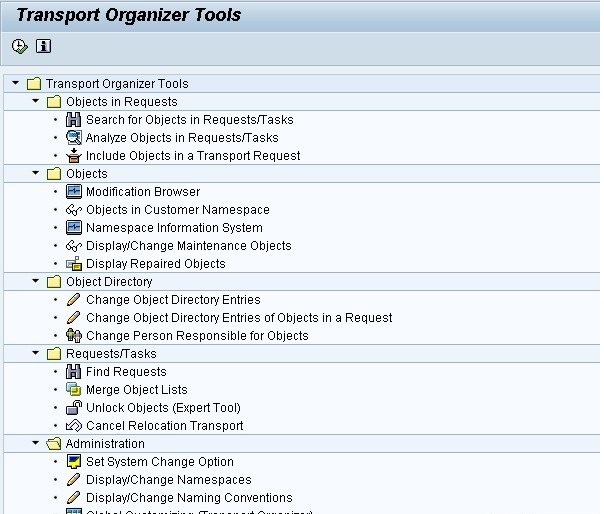
1. Go to transaction code SE03. Double click on Display Repaired Objects under the Objects.

SE03 - Transport Organizer Tools

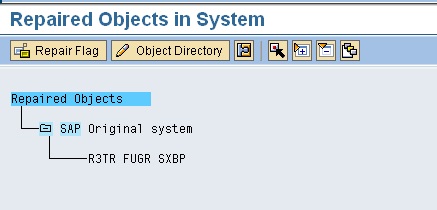
2. Select the Object and Repair flag. Then, you can resume the import queue back.

SE03 - Repaired Objects in System

Ref:1541124 – Importing of a Support Package or transporting a change request errors out: “object was repaired in this system”


Patch Administration

PATCH ADMINISTRATION:
A Patch/ Support Package is a collection of error corrections. A patch comes as a part of Online Correction Support (OCS). A patch eliminates an error in an R/3 System. It is made available before the next R/3 release that contains the correction. A patch replaces the objects affected by the error, rendering their old versions obsolete. One can only import complete support package and in a specified sequence. Each correction in a patch is documented in an SAP note.
Support Packages replaced hot packages. Support Package covers only one software component type unlike hot package.
The naming convention for support packages/patches should be as follows:
                                  SAPK
For BASIS—– SAPKBXXXXXXX
For ABAP——SAPKAXXXXXXX
For Applications—–SAPKHXXXXXXX
For HR——-SAPKEXXXXXXX
The Support Packages should be administered in the following sequence: BASIS, ABAP, APPLICATIONS and HR.
Similar patch levels should be maintained across DEV, QAS and PRD.
The following packages types are few among that are available:
1. SPAM/ SAINT update: This update will contain changes and improvement related to SAP Patch Manager and SAP Add-on Installation Tool.
2. Component Support Package: This package is valid for one software component (Viz. SAP_APPL, SAP_BASIS, SAP_HR) and contains corrections to errors in the Repository and Dictionary pertaining to the software component only. In addition to the corrections, support packages for SAP_HR also contain adjustments due to legal changes.
3. Add-On Support Package: This package is valid for add-on with a particular release and contains corrections for this add-on.
SPAM/ SAINT update and patches are applied through the Support Package Manager (transaction code SPAM).
Most of the updates and patches are in the form of .CAR files and these are available for download at SAP Marketplace.
SPAM:
SAP Patch Manager (SPAM) is the customer side of the Online Correction Support (OCS). For applying patches, SPAM is executed in 000 Client of an R/3 system. SPAM lets one to apply the patches in the correct order by creating a patch queue. One has to confirm each successive patch queue before the next one is setup. The tcode SPAM calls for the programSAPMSPAM.
Go through for prerequisites before applying a patch to a software component. All the       prerequisites have to be fulfilled before a patch can be applied.
         
1) Schedule window (off peak time) and download the patches from market place.
2) Check if \USR\SAP\\TRANS\EPS\In directory has sufficient space.
3) Check if the table space has not up to 90%.
4) Check if you have sufficient space at O/S level.
5) Update SPAM version, if needed.
6) Download the .CAR files of the patches to be applied onto the system. Uncar the files (patch) by using cmd prompt and change the path to the directory where you have downloaded the patches. Make sure that the TRANS directory should have asapcar.exe executable, if you don’t have one, copy it from \USR\SAP\SID\SYS\EXE\RUN.
Use the command CAR –xvf >:\ \.CAR. The command CAR is case sensitive.
7) When you uncar the .CAR file, .ATT and .PAT files will be generated and they have to be present in \USR\SAP\\TRANS\EPS\In directory before the process of applying patch is initiated.
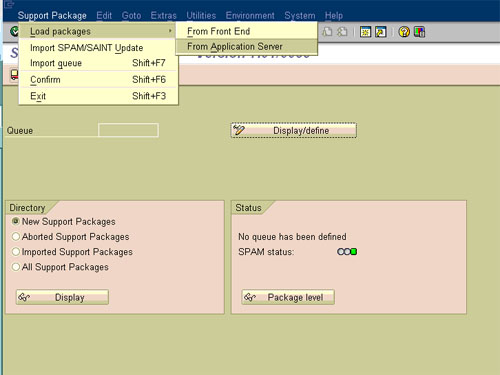
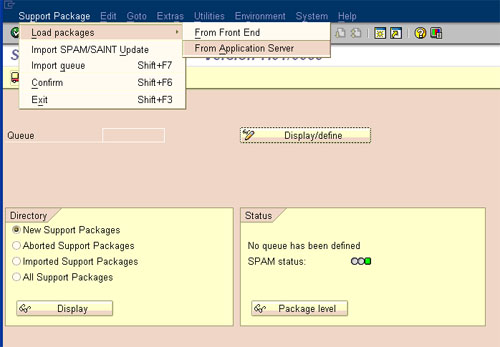
  1. Log in 000 client as admin user, execute transaction code SPAM and choose SUPPORT PACKAGE tab. Select LOAD PACKAGES tab and choose either “from front end” or “from application server” option
  2. Confirm the selection by selecting the tick button.
  3. System will read the contents from EPS/in directory, then it will import the contents into queue, then choose DISPLAY/DEFINE button
  4. The total available components like ABAP, BASIS, HR, APPL and add-ons etc., will be shown. Choose the type of component which you have uncarred and confirm the selection.
  5. Now that the selection has been made, the selected component will be displayed in the Queue box as shown.
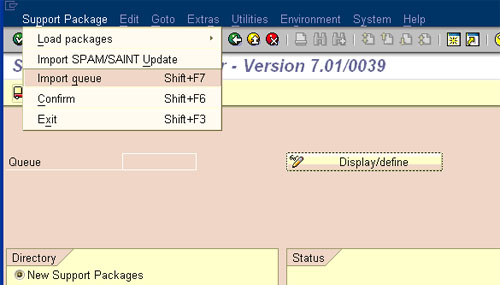
  6. Select either “import queue” option located under “Support Package” tab or the truck button located on SPAM screen so as to initiate the import queue process. Upon the process completion select the confirm option under the SUPPORT PACKGE tab.
  7. After confirming the package into queue, the import process will run and apply the selected software component to the existing installed software application
ADD-ON:
An Add-on can be defined as a set of software components intended to add specific abilities to a larger software application. An Add-on can also be referred to as Plug-in.
In SAP, Add-ons are installed on to the SAP system using the SAP Add-On Installation Tool. This tool can be accessed by executing the transaction code “SAINT”. Before applying an add-on onto the system, please check for the add-ons already installed on the system. Also check the type of add-on downloaded, whether it is intended for Upgrade or Installation. If it is an upgrade add-on, make sure that the earlier version of the add-on and its related patches has been installed on the system, prior applying the upgrade add-on onto the system.
Add-ons are also in the form of .CAR files like the support packages and these files contain the .ATT files and .PAT files.
Download the .CAR files of the add-ons to be applied onto the system. Uncar the files (patch) by using cmd prompt and change the path to the directory where you have downloaded the add-ons. Make sure that the TRANS directory should have asapcar.exe executable, if you don’t have one, copy it from \USR\SAP\SID\SYS\EXE\RUN.
Use the command CAR –xvf >:\ \.CAR. The command CAR is case sensitive
When you uncar the .CAR file, .ATT and .PAT files will be generated and they have to be present in \USR\SAP\\TRANS\EPS\In directory before the process of applying add-on is initiated.
SAINT:
The SAP Add-On Installation tool was developed to enable users to install the add-ons directly from their standard SAP system.
SAINT will have the following authorizations against it. The tcode SAINT calls for the program SAPLSAINT.
  1. Log onto the 000 Client with administrator privileges
  2. Execute the transaction code “SAINT”.
  1. In the upper half of the screen you see the installed add-ons. The lower half displays the add-on packages to be installed. Click on the required add-on and click on the start button to move ahead in the add-on installation process.
  2. The following screen will be displayed wherein we have to load the additional support packages, if any, located in the /trans/Eps/In directory.
  1. From the available set of support packages located in the /trans/EPS/In directory, choose the support packages that are required for the installation and click continue to finish the installation.

List of Phases in SPAM and SAINT

Support Package Manager: Phases 
The Support Package Manager informs you of the status of the phase currently being executed in the status bar. If you want to know which phases are executed for which scenario(test or standard scenario), run the program RSSPAM10.
 The following list provides an overview of all the modules and phases and lists them in the order in which they are executed by the Support Package Manager:
Preparation Module
       1.      PROLOGUE
This phase checks whether you are authorized to import Support Packages.
       2.      CHECK_REQUIREMENTS
This phase checks various requirements for importing a Support Package, for example, whether the transport control program tp can log on to your system.
       3.      DISASSEMBLE
This phase unpacks files from the appropriate EPS parcels and saves them to the transport directory.
       4.      ADD_TO_BUFFER
This phase places the queue in the transport buffer of your system.
       5.      MODIFY_BUFFER
This phase prepares the transport buffer for correct processing of the following import phases.
       6.      TEST_IMPORT (8)
This phase performs a test import for the queue with the transport control program tp. The system checks whether there are objects that are in open repairs and that are overwritten during the import, or whether other conditions prevent the import of an object.
       7.      IMPORT_OBJECT_LIST (6)
This phase imports the object lists for the Support Packages in the queue into the system.
       8.      OBJECTS_LOCKED_?  (7)
This phase checks whether there are objects that are overwritten by the import, and that are still in unreleased requests.
       9.      ADDON_CONFLICTS_?
This phase checks whether there are conflicts between objects in the queue and any installed add-ons.
      10.      SCHEDULE_RDDIMPDP
This phase schedules the transport daemon (program RDDIMPDP).
Import 1 Module
   11.      CREATE_VERS_BEFORE
This phase generates versions of the objects that are contained in the Support Packages in the queue (if this option is set).
   12.      SPDD_SPAU_CHECK
In this phase, the system checks if a modification adjustment is necessary (transactions SPDD/SPAU).
   13.      DDIC_IMPORT
This phase imports all ABAP Dictionary objects in the queue.
   14.      AUTO_MOD_SPDD
This phase checks whether all modifications to ABAP Dictionary objects can be adjusted automatically.
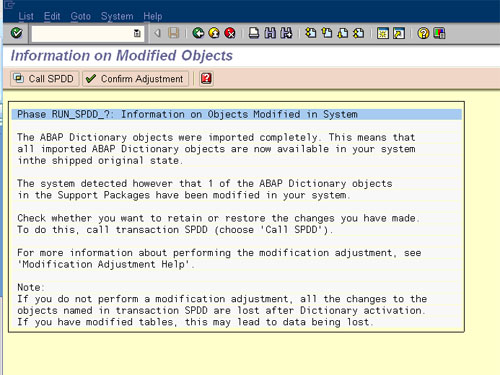
   15.      RUN_SPDD_?
In this phase, you are asked to adjust your modifications to the ABAP Dictionary objects by calling transaction SPDD.
   16.      LOCK_EU (only for import mode downtime-minimized)
This phase locks the development environment.
   17.      INACTIVE_IMPORT (only for import mode downtime-minimized)
This phase imports program code and program texts in an inactive state.
   18.      DDIC_ACTIVATION (16)
This phase activates the imported ABAP Dictionary objects.
Import 2 Module
   19.      IMPORT_PROPER (17)
This phase imports all the Repository objects and table entries if they were not already imported in the INACTIVE_IMPORT phase. This is preceded by actions such as table conversion and activation of the name tabs.
   20.      PREPARE_XPRA
This phase prepares the execution of the XPRAs and after-import methods.
   21.      UNLOCK_EU (only for import mode downtime-minimized)
This phase unlocks the development environment.
   22.      AUTO_MOD_SPAU
This phase checks whether modifications can be adjusted automatically.
   23.      XPRA_EXECUTION
This phase executes the XPRAs and after-import methods.
   24.      ABAP_GENERATION
This phase generates the runtime objects for the imported Repository objects (ABAP source texts and screens).
Clean Up Module
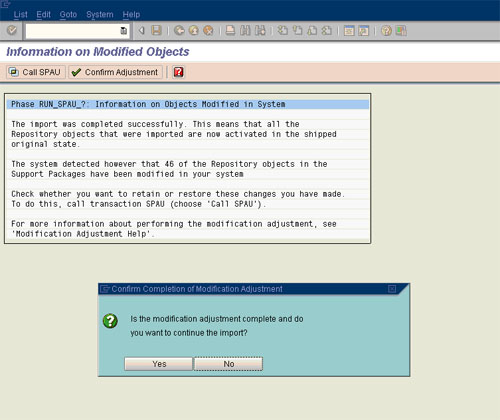
   25.      RUN_SPAU_?
This phase prompts you to adjust your modifications to Repository objects by calling transaction SPAU.
   26.      CLEAR_OLD_REPORTS (only for import mode downtime-minimized)
This phase deletes the obsolete versions of program code and program texts in the database.
   27.      EPILOGUE
This phase completes the import. Among other things, it checks whether the queue has been processed completely.

Add-on installation and add-on Support Packages

1.    What general should I take into account before installing an add-on?

It is recommended that you install the latest SPAM version and use the latest versions of tp and R3trans before the installation. In addition, you must also refer to the special note created for every add-on. In this case, any necessary recommendations that apply to Support Package queues with CRTs have priority over generally available notes for Support Packages queues.

2. Can several Add-ons be installed simultaneously?

There is no general answer to this question. It depends on the add-on. In general, PI can be used with all add-ons, although add-ons cannot be installed at the same time as each other. You should also refer to the note on installing the relevant add-on in particular.

3. Can I delete an add-on again?

In the case of some add-ons (for example, YEAR2000), you can either delete it ‘passively’ during an R/3 upgrade or you can use a relevant deletion request which is included in the upgrade. However, in general, add-ons can no longer be deleted. For more information, see note 33040.

4. What is the difference between a CRT and an add-on patch (AOP)?

A CRT eliminates conflicts between the add-on and R/3.A conflict means that objects were delivered via R/3 Support Package R/3 that were also delivered via the add-on in another form. These objects are overwritten when you import the standard Support Packages and the add-on is therefore inconsistent. For this reason, these objects must be adjusted so they are compatible with the add-on. This adjustment is carried out with CRTs, while add-on patches are packages that only contain objects which correct add-on errors. For more details, see note 160168.

5. Where can I find add-on patches or CRTs?

CRTs and add-on patches are only available in the SAP Service Marketplace (http://service.sap.com/patches).

6. Can I import a collective CRT for Support Packages whose queue does not comply with the standard recommendation together with the Support Packages?

The queue specified by the add-on generator has priority over the notes mentioned in the OCS notes for the different releases (for example, for Rel. 4.6 note 173814).Usually none of the collective CRTs used to correct conflicts with Support Packages should have a queue that cannot be imported at the same time.

7. Can I install an add-on even though the number of component Support Packages installed is higher than the number than the number actually required in the add-on installation instructions?

In this case, check whether CRTS are required and available for Support Packages (over shooters) that are imported over and above the description. If these CRTs are available, you can install the add-on, but you must also incorporate the CRTs.However, the add-on cannot be installed if the CRT required for the highest Support Package already imported has not yet been released.

8. Can I include CRTs or AOPs for an add-on in the upgrade?

Yes, this is possible as of target release 46C SR2.

9. Can I switch from any PI-version to the latest version?

No, since delta transports are involved with PI, you must follow the procedure step by step. For example: Initial version PI 2001_1_, target PI 2002_1_; Link:=> PI 2001_2_ => PI 2002_1_<REL
For more details on PI and its upgrade link, see the Service Marketplace at http://service.sap.com/r3-plug-in.An upgrade matrix and possible links for an R/3 upgrade including PI are also available here.

SAP Basis: Apply ABAP Support Packages

1. Change Preparation
1. The ABAP support packs to be applied should be clearly defined and justified.
2. The ABAP support packs should be extracted to ‘/usr/sap/trans/EPS/in’ of the transport system related to the SAP system being patched.
3. If not at the latest version, update SPAM/SAINT by Goto ->Update SPAM in transaction SPAM.. This should be determined ahead of time.
4. Confirm if the current SAP kernel and tp and R3trans versions are adequate for the support packs being applied. (You may find it service marketplace where you download the pack)
5. Confirm with the appropriate database backup team, that a good backup exists before starting.
6. There is no downtime and monitoring should be active to catch potential database and filesystem space issues.
7. If the database is Oracle, find the tablespace containing D010TAB.
In older releases of SAP use transaction DB02, click on detailed analysis, enter object name D010TAB and hit green check. Doubleclick on the object D010TAB in the list and the indexes will be shown too. To check tablespace freespace in DB02, click current sizes button in the tablespaces section.
In newer releases of SAP use transaction DB02, expand folder tree Space –> Segments, doubleclick on Detailed Analysis. Enter D010TAB in Segment field and hit green check. Choose tab ‘Table + Indexes’ in the resulting window at the right. To check tablespace freespace, expand folder tree Space –> Tablespaces, doubleclick on Overview.
a. The tablespace containing table D010TAB should have at least 4GB of free space.
b. The tablespace containing indexes for table D010TAB should have at least 4GB of free space.
c. If table D010TAB and its indexes are in the same tablespace, that tablespace should have at least 8GB of free space.
2. Change Considerations
1. The customer should have a defined test plan and be aware of the implications the support packs will bring to their SAP system.
2. Procedure valid for ABAP support packs for all SAP releases.
3. Known Complications
Check for issues before applying the support packages by looking up the relevant SAP Note ‘Known problems with support packages’ by release in the SAP service marketplace. This should be done well ahead of the proposed date/time because any issues may effect the build plan.
CHANGE EXECUTION
4. Build Plan
1. Log into Client 000 with a regular userid (not SAP* or DDIC)
2. Execute transaction SPAM
3. In the menu, choose Support Package –> Load packages –> From Application server
4. Apply latest SPAM update if not already done. (see change prep step 3 above)
5. Once packages have been loaded – define a queue (Warning: you will need to check the SAP note relevant for your SAP release for appropriate queue definition. If you do not choose accordingly, you may need to restore from the last database backup and start again.)
6. Once queue has been defined – click the import queue button.
7. If a transport was provided and noted in the SR to be included with the support packs, specify it in the popup window: ‘Add modification adjustment transports to the queue’.
8. Change the start options to ‘Start in background immediately’ for all 4 phases: prep, import 1, import 2 and clean up.
9. If you get an error about ‘Open Data Extraction Requests’, check with PDL on how to proceed.
10. If you get prompted about modification adjustments (SPDD/SPAU) for SAP objects that were changed, followup with ABAP team. It is recommended to revert all changes to SAP standard. The customer’s developers and functional teams need to be informed about the list of objects. They will determine how to act on each changed object and will give notice when to continue applying the support packs.
11. Check the support pack logs for any errors. Click the logs button. Return codes 0 and 4 are ok.
12. Once all the support packs have been imported successfully, click the confirm queue button.
13. Repeat steps 5 thru 12 until all the support packs defined in the SR are completed.
14. Run transaction SGEN to regenerate programs. Choose option ‘Generate all objects in selected software components’ and select the components for which the support packs were updated.
5. Back-out Plan
In the event that problems arise which cannot be resolved, then a full system restore is required to a point in time before support packs were implemented.
6. Post-test Plan
Logon to the SAP system, run Sm51, check all application servers are up.
Run transaction SICK, which should be successful.
If system is not coming up, troubleshoot.
You may contact me know if you are getting any errors.

Step-by-Step Procedure for SPAM Update/patching.

n this Blog we will look at updating SPAM . SPAM or Support Package Update Manager is one of the two (The other being SAINT) primary tools for patching SAP ABAP system . For updating SAP Java systems you use JSPAM . If time permits I will write more about the differences and SAP’s overall release & versioning strategy and JSPAM (or lack of it!).
Updating SPAM is a relatively straightforward and simple procedure. The key thing to remember is that you MUST always update your SPAM before proceeding with any Support Package update. Even if you are simply conducting a review to determine the dependencies of the different support packages and which ones to eventually include in the SP upgrade project, you need the latest SPAM version otherwise you could be working with incorrect or outdates information.
Having  said that, SPAM is not always 100% correct in determining dependencies. I had a experience where it was asking for a secondary dependency which we could find on SAP Marketplace. Eventually after much investigation and logging a call with SAP Support, I was  told to ignore the dependency…so just a warning

Step by Step Instructions

In SAP, you always “uncar” (unzip) your sap packages using the SAP tool SAPCAR
Unpacking SAPCAR archives: Uncar in folder /usr/sap/trans
sapD00:d00adm 42% SAPCAR -xvf /usr/sap/trans/spam/KD70142.SAR -V
SAPCAR: processing archive /usr/sap/trans/spam/KD70142.SAR (version 2.01)
x EPS/in/CSN0120061532_0049370.PAT
SAPCAR: 1 file(s) extracted
Tip: Always uncar in /usr/sap/trans as in will create the directories /EPS/in under this directory structure otherwise it will create the …/EPS/in the whichever directory you unzip
Location after expand/Uncar: (must be in this location for SPAM to see it)
/usr/sap/trans/EPS/in
PS: You can also directly import the package from you local desktop.
SPAM Update:
Step 1- Load packages
Log into SAP and call tcode SPAM. It will see the new unzipped packages in ../EPS/in folder
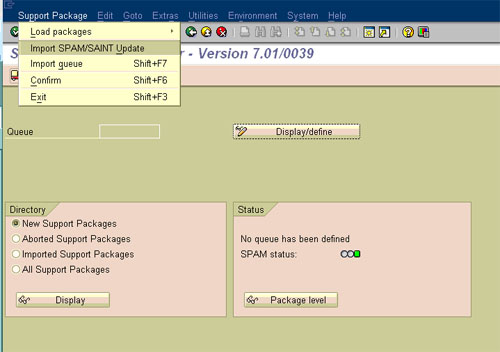
Step 2 – Import Spam update
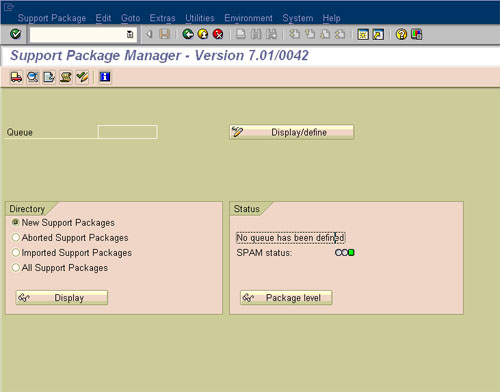
SPAM Updated Successfully!! (Make sure you see a green light)
Possible Errors: You may get an ABAP Dump at the end. Don’t Panic! Simply restart the SPAM tcode and you should see the green light and to confirm it is updated, make sure it reads the new version e.g in this case 7.01/0042

Step-by-Step process of Importing Support Packages into ECC6 EHP4 System

In this blog we look at a step-by-step procedure to import HR support packages (HR Sp 16 to 20) & (EA-HR 16 to 20) into a ECC6 system with EHP4.
The most important part of the installation is the preparation work. This is absolutely critical that side-effect notes, relevant basis notes and patches are applied before applying the support packages (see appendix). 99% Preparation, 1% perspiration!
Remember you can only download SP’s from Solution manager (well sort of). What SolMan really does is generate the link for you to download the SPs. Once you have the link generated, you can just call the link from your browser independent of SolMan (see appendix on process).
Another point I want to highlight is in this scenario, we are simply updating a subset of Support packages i.e HR support packages and not the Support Pack ‘Stack’. Whilst it is recommended to apply the stack, this is not always practical and feasible due to resources, availability to test and other complexities in large SAP landscapes.
1.1       Check all pre-requisites are met, e.g file system space, SAP notes, locked users, etc. See appendix below for checklist of what to do.
1.2       Login to Client 000 with a Super User (SAP_ALL/SAP_NEW)
1.3       Ensure all the required SP’s have been downloaded from the SAP Marketplace and have been unzipped/uncarred into the …./EPS/in folders. The process of identifying which SP’s to load and the interdependencies is a separate task on its on and usually conducted in conjunction/direction of the application/functional team
1.4       Load SP’s from App server (you must first download the *.SAPCAR files and extract it in …usr/sap/trans/EPS/in
1.5       Define Queue. – Essentially what you are doing here is telling SAP which SPs you want to import. It is intelligent enough to calculate interdependencies.
Load the SP’s from the Application server (after you have unzipped them into the ../EPS/in folder). Pick the highest SP number. (It will automatically included other SP’s or dependencies.). If you are importing SP for different modules e.g HR, Finance, etc, then you may need to build the queue and change the settings to “Calculation for a Vector of components”.
Queue calculation for a vector of software components:
The Support Package queue calculation takes place for multiple software components based on the target Support Package level that has been defined for each software component (see Defining a Queue Based on Multiple Software Components).

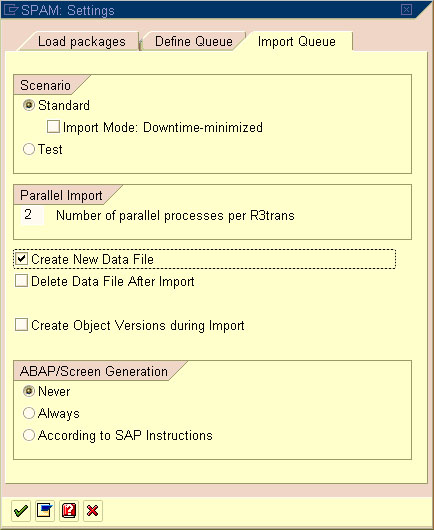
1.6       Check SPAM settings:

You can schedule more parallel processes if you like and if you system can support. These are the typical settings I use when importing initially into a development system
Check if the SPAM settings are as follows :
Section Import queue
Create new datafile = Yes (only in DEVELOPMENT)
Delete data file after import = No
Section ABAP/Screen Generation
Generate screen = Never

1.7       Import Support Packages (Shift + F7)

This step onwards basically kicks starts the SP import process. From now onwards, there is no going back (well almost).
Please refer to link on SAP Help below for known errors during import:
Generally I Run phase 1 in ‘dialog mode’ and all other phases in ‘background’ mode
These are the various phases the SPAM goes through during the import process. You will see the phases change in the ‘Status’ section in tcode SPAM:
Preparation Module
1.      PROLOGUE
This phase checks whether you are authorized to import Support Packages.
2.      CHECK_REQUIREMENTS
This phase checks various requirements for importing a Support Package, for example, whether the transport control program tp can log on to your system.
3.      DISASSEMBLE
This phase unpacks files from the appropriate EPS parcels and saves them to the transport directory.
4.      ADD_TO_BUFFER
This phase places the queue in the transport buffer of your system.
5.      MODIFY_BUFFER
This phase prepares the transport buffer for correct processing of the following import phases.
6.      TEST_IMPORT
This phase performs a test import for the queue with the transport control program tp. The system checks whether there are objects that are in open repairs and that are overwritten during the import, or whether other conditions prevent the import of an object.
7.      IMPORT_OBJECT_LIST
This phase imports the object lists for the Support Packages in the queue into the system.
8.      OBJECTS_LOCKED_?
This phase checks whether there are objects that are overwritten by the import, and that are still in unreleased requests.
9.      ADDON_CONFLICTS_?
This phase checks whether there are conflicts between objects in the queue and any installed add-ons.
10.      SCHEDULE_RDDIMPDP
This phase schedules the transport daemon (program RDDIMPDP).
Import 1 Module
11.      CREATE_VERS_BEFORE
This phase generates versions of the objects that are contained in the Support Packages in the queue (if this option is set).
12.      SPDD_SPAU_CHECK
In this phase, the system checks if a modification adjustment is necessary (transactions SPDD/SPAU).
13.      DDIC_IMPORT
This phase imports all ABAP Dictionary objects in the queue.
14.      AUTO_MOD_SPDD
This phase checks whether all modifications to ABAP Dictionary objects can be adjusted automatically.
15.      RUN_SPDD_?
In this phase, you are asked to adjust your modifications to the ABAP Dictionary objects by calling transaction SPDD.
16.      LOCK_EU (only for import mode downtime-minimized)
This phase locks the development environment.
17.      INACTIVE_IMPORT (only for import mode downtime-minimized)
This phase imports program code and program texts in an inactive state.
18.      DDIC_ACTIVATION
This phase activates the imported ABAP Dictionary objects.
Import 2 Module
19.      IMPORT_PROPER
This phase imports all the Repository objects and table entries if they were not already imported in the INACTIVE_IMPORT phase. This is preceded by actions such as table conversion and activation of the name tabs.
20.      PREPARE_XPRA
This phase prepares the execution of the XPRAs and after-import methods.
21.      UNLOCK_EU (only for import mode downtime-minimized)
This phase unlocks the development environment.
22.      AUTO_MOD_SPAU
This phase checks whether modifications can be adjusted automatically.
23.      XPRA_EXECUTION
This phase executes the XPRAs and after-import methods.
24.      ABAP_GENERATION
This phase generates the runtime objects for the imported Repository objects (ABAP source texts and screens).
Clean Up Module
25.      RUN_SPAU_?
This phase prompts you to adjust your modifications to Repository objects by calling transaction SPAU.
26.      CLEAR_OLD_REPORTS (only for import mode downtime-minimized)
This phase deletes the obsolete versions of program code and program texts in the database.
27.      EPILOGUE
This phase completes the import. Among other things, it checks whether the queue has been processed completely.

1.8       Main Import Phases and Actions required.

In the following steps below, I  only highlight only the main phases and the necessary actions required. Generally if you have done your homework and checked and met all prerequisites, you should a relatively smooth import process.

1.8.1       SPDD Adjustment – Handover to Developer

SPAM -> Goto -> Status – Queue to confirm adjustment to proceed to next phase

1.9       SPAU Adjustment

After the SPDD  is completed, it will go through a number of phases and eventually pause at SPAU adjustment phase (RUN_SPAU). Now again, ask the developers to continue with the SPAU adjustments (This is only done in Development systems. For changes to take place in all downstream systems, transports are created and imported into e.g QA and PROD and usually after the SP’s are applied).
Once developers complete their SPAU adjustments successfully (be patience, this can take from several hours to a week or more depending on size of landscape and amount of customising), simply resume i.e Goto  Support Package -> Import Queue (similar to SPDD steps)

1.10       Tail end – EPILOGUE

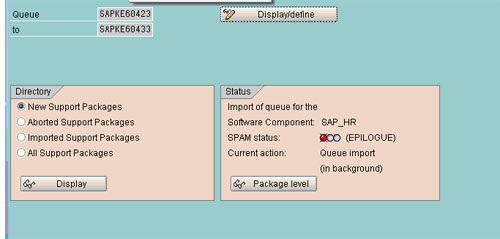
Finally, it all goes well, the last phase is the EPILOGUE as shown below. This should not take that long and once completed, you proceed to confirm (or complete) the import with the next step
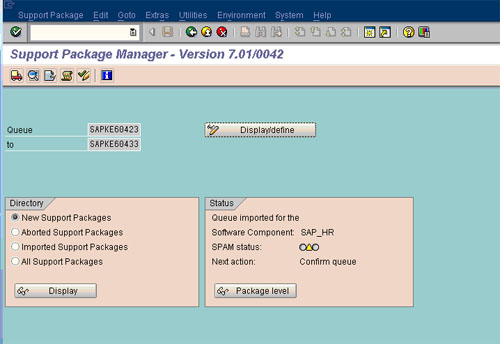
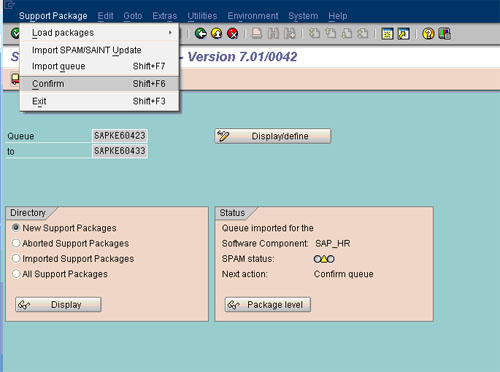
Once EPILOGUE completed, the Status will turn Yellow. You must then go to Support Packages -> Confirm (Shift F6) to close off or complete the SP implementation.

1.11       Lastly, CONFIRM queue

Method to confirm queue shown below.

2         Post Steps – SGEN

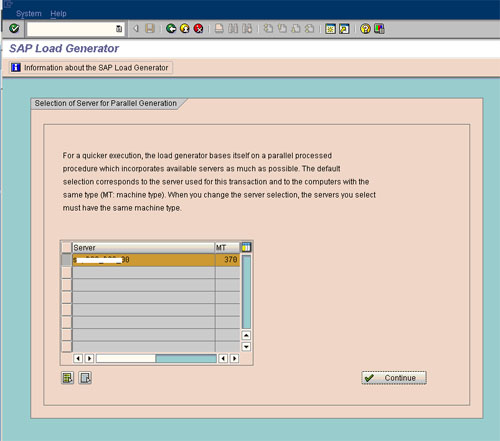
Once import is completed, proceed to run SGEN to recompile all the new imported objects before releasing the system. Steps shown below.
Run SGEN with options
Regeneration of existing loads
Only generate objects with invalid loads
Wait until finished !

Appendix  – Additional Info

2.1       Checklist before Import of SPs

This is my checklist but others may have more to add (or remove!)
  1. Confirm and sign-off the support pks and combination of SPs that will be applied and project/test team available for testing
  2. Verify all functional and cross-system dependencies are met. Must review and OSS note 822379 (netweaver 7 version)
  3. Enough Disk space and atleast 85% free space on sapdata filesystem
  4. Check if file system /usr/sap/trans/data and ../EPS/in  has free space, if not clean-up old support package data files or Pat files in EPS/in
  5. Post a system message & a login screen message indicating the outage (refer to procedure Applying Support Packages).
  6. Check if no tablespace is over 85 % full
  7. Verify if you have a recent backup., if not schedule a full on-line backup. If production, have a backup just before Support pkgs to be safe.
  8. Unpack all required SP’s and then load them into SPAM and verify that all queues are OK  e.g SAPCAR -xvf /sapcd/sp/XXXXXXX.CAR –V
9. Update Spam with latest version from Service marketplace. Also ensure binaries R3trans and tp are updated if necessary. If you are not sure, usually it will not hurt to update these anyway.
10. Define Queue and perform TEST import and report any SPDD/SPAU conflicts to project/developers

2.2       Using SolMan to download Support Packages

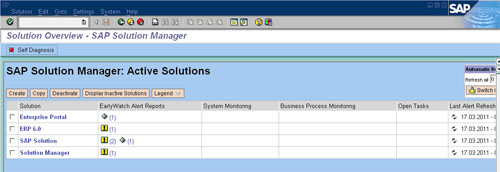
Call tcode  /nsolution Manager
Select the Solution ‘SAP Solution’ if you are going to download SP’s for ECC 6.0 SAP System for your environment.
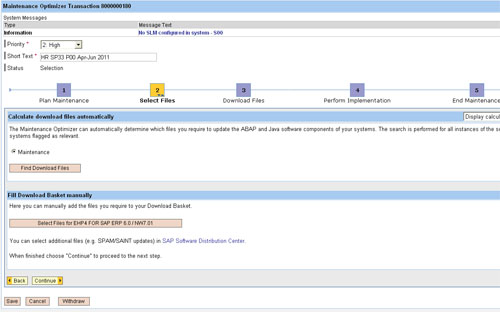
Create a new ‘Maintenance Optimizer’ or use existing
Here you can select the SP’s to download either manually and automate i.e Let SAP decide
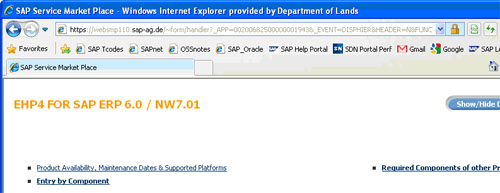
A Web browser window will pop up and you need to manually look for and select the e.g HR support pkgs.

Support Package & Stack Updates – Ultimate Guide

What is a Support Package?
When an end user of SAP finds a bug in the SAP product, he reports the same to SAP support. SAP programmers inspect the bug and develop a correction for the bug. This correction is known as SNOTE (SAP Note).
With time, multiple end users, report bugs for which SAP releases SNOTE. SAP collects all these corrections in one place and this collection is called SUPPORT PACKAGE. This support package also includes enhancements to earlier versions of SAP.
In simple words collection of SAP NOTES is called as SUPPORT PACKAGE.
Support Packages are implemented in SAP system using Transaction SPAM (Support Package Manager)
What is Support Package Stack (SPS)?
The Support Package Stack is a list of ABAP and Java Support Packages for all software components (SC) included in SAP NetWeaver. It is used to bring each Software Component of SAP NetWeaver to a defined Support Pack (SP) level.
Support Package Stack , commonly known as STACK bundles all required components or individual patches that are already tested together and recommended applying as SPS instead of individual patch (until and unless you face some problem which requires certain components to be patched).
Go to http://service.sap.com/sp-stacks/, select your NW version to check the current SPS level and other details.
What are Support Pack Stack version numbers ?
Support Package Stacks have a release number, and a Stack number, Example, SAP NetWeaver ’04 Support Package Stack 11.
Each software component has a separate sequence of Support Packages. The following list contains the technical names of a number of components and the notation for their Support Packages:
COP (Component Package):
SAP_APPL (SAP APPL Support Package): SAPKH<no>
SAP_BASIS (Basis Support Package): SAPKB<no>
SAP_ABA (Application Basis SP): SAPKA<no>
SAP_HR (SAP HR Support Package): SAPKE<no>
SAP_SCM (SCM Support Package): SAPKY<no>
SAP_BW (BW Support Package): SAPKW<no>
SAP_CRM (CRM Support Package): SAPKU<no>
 Pre-requisites for Support Package implementation:
Support packages should be always applied in client 000.
The user to be used for the support package implementation must have authorizations equivalent to DDIC or SAP*
Call the transaction SPAM and see if any previous Support Package import is incomplete. You can proceed ahead unless the previous support package import is successful.
Ensure that there is enough space in the transport directory. The transport directory is located at /usr/sap/trans
Steps to Upgrade the Support Package:
Step 1: Download Support Packs
Support Packages are available in SAP Support Portal, under service.sap.com/patches.
Step 2: Loading Support Packages:
To load support packages we have two options:
From Application Server
From Front End
From Application Server
Download the support packages from service marketplace and save them at OS level in directory /usr/sap/trans.
Uncompress these files using sapcar executable
sapcar –xvf <support package name>
After uncompressing the support packages at OS level the .PAT and .ATT files are stored in /usr/sap/trans/EPS/in directory.
Next, load the Support Packages into SAP system by choosing  Support Package –>Load Package  –> From Application Server
From Front End
Choose Support Package –> Load Packages –> From Front End
Step 3: SPAM/SAINT Update:
A SPAM/SAINT Update contains updates and improvements to Support Package Manager (SPAM) and Add-On Installation Tool (SAINT). There is always one SPAM update for each release. SPAM/SAINT update is mandatory before any support package upgrade.
Step 4: Defining Queue
Queue contains the Support Packages available for the different SAP Components installed in your system. This Queue information is derived from the support pack uploaded in Step 2.
1.On the initial screen in Support Package Manager, choose Display/Define.
2.A list of installed software components (for example, SAP_BASIS, SAP_HR, SAP_BW) is displayed.
3.Once you select the required component, the current queue appears. This queue contains the Support Packages available for the selected component in your system. If you want to define the queue for another software component, choose Other Component. If the displayed queue meets your requirements, you can confirm it by choosing Confirm Queue
Step 5: Importing Queue.
Once you a define a Queue (Step 4) while selecting a particular component (for which we want to upgrade support pack), we need to do ‘Import queue’ to start importing/applying that particular selected support pack (as per the standard SAP process).
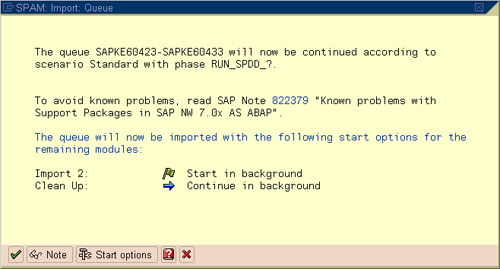
Choose Support Package –> Import Queue


To become familiar with known problems and issues, always read the note mentioned in above screenshot.
The support package import has been started
Step 6: Confirming Queue:
Confirm that the queue has been imported successfully into your system. This allows you to import Support Packages in the future. You will not be able to import Support Packages further,if you do not confirm the queue.
Once Queue has been imported, SPAM status becomes YELLOW
Confirm successful import of the Support Packages into your system by choosing Support Package à Confirm.
Checking Logs
  • IMPORT LOG :It displays logs for Support Package Manager Phases that are used by transport control program tp(transport control program).
Go to–>Import log–>Queue
  • ACTION LOG: It contains information about the actions that take place during the individual phases (while importing the current queue).
It also includes information about the point at which a phase was stopped, as well as detailed error information.
To display the logs for the current queue Go to–>Action log
  • While the support packages are being imported, logs are made into the tmp directory (path: usr/sap/trans/tmp)
  • Once the import process is completed logs can be viewed from the log directory (path: usr/sap/trans/log)