SAP Database T Codes
=================
DBCO – database Connection Maintenance
DBACOCKPIT – Start DBA Cockpit
DB11 – Create database Connection
SAP Sybase ASE
================
ASE is short for “Adaptive Server Enterprise”, the relational database management software manufactured and sold by Sybase, Inc. ASE is a versatile, enterprise-class RDBMS which is especially good at handling OLTP workloads. ASE is used intensively in the financial world (banks, stock exchanges, insurance companies), in E-commerce, as well as in virtually every other area.
The most recent ASE release is ASE version 15.7 (released September 2011); the previous release is version 15.5.
ASE 15.7 is also known as “the SAP release” since this is the ASE version that SAP is using to support the Business Suite ERP package on top of Sybase ASE.
ASE runs on the main flavours of Unix, on Linux, and on Windows.
========================================================================
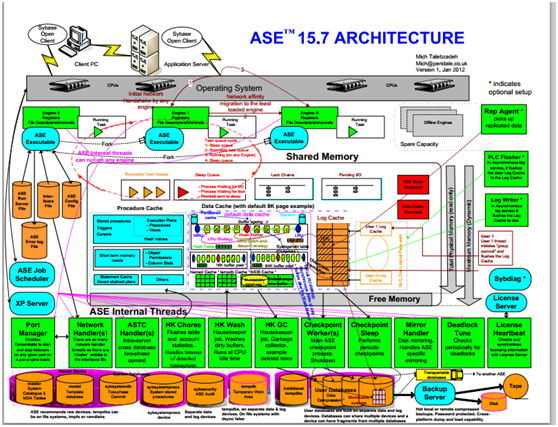
Sybase Architecture
Installation Directory Contents and Layout
SAP ASE includes server components that are installed into specific directories
| Product |
Description |
| SAP ASE |
>Installed into the ASE-16_0 director >SAP ASE – the database server.
>Backup Server – an application based on SAP® Open Server™ that manages all database backup (dump) and restore (load) operations.
> XP Server – an Open Server application that manages and executes extended stored procedures (ESPs) from within SAP ASE.
>Job Scheduler – provides a job scheduler for SAP ASE. Job Scheduler components are located in ASE-16_0\jobscheduler\. |
| Connectivity |
Installed into the OCS-16_0 directory:
>Open Client™ (Client Library, dblib)
>ESQL/C
>ESQL/COBOL
>XA
>Installed into the DataAccess and DataAccess64 directories:
>ODBC (Windows, Solaris SPARC, Solaris x64, Linux Power, HP-UX Itanium, IBM AIX) – a driver used to connect to SAP ASE from ODBC-based applications.
>ADO.NET (Windows only) – a provider used to connect to SAP ASE from .NET based applications. |
| Shared Directory |
The Shared directory contains components and libraries that are shared by several other components. In earlier versions, this directory was named Shared-1_0.
> Java Runtime Environment (JRE) – is a runtime Java virtual machine used to execute Java-based programs, such as SAP Control Center. SAP ASE includes the JRE. In typical installations, by default, the JRE is fully installed. In custom installations, if you select a component for installation that requires the JRE, the JRE is also automatically selected. It is located in the Shared\SAPJRE-7_0 * directory. |
| SAP Control Center |
SAP Control Center logs and utilities – files related to the Web-based tool for monitoring the status and availability of SAP ASE servers. They are installed into the %SYBASE%\SCC-3_3 directory.
Note: The SAP ASE typical installation option installs only the SCC Remote Command and Control (RCC) agent. To use a GUI-based connection to the SCC server using a Web browser, you must use the custom installation option to install the SCC Management User Interface for SAP ASE. |
| Language Modules |
Installed into the locales directory. Provides system messages and date/time formats. |
| Character Sets |
Installed into the charsets directory. Provides character sets that are available for use with SAP ASE. |
| Collation Sequences |
Installed into the collate directory. Provides the collation sequences that are available for use with SAP ASE. |
| Sybase Software Asset Management (SySAM) |
Installed into the SYSAM-2_0 directory. Provides asset management of SAP ASE servers and optional features. |
| Web Services |
Installed into the WS-16_0 directory. An optional product that provides access to SAP ASE using HTTP/SOAP and WSDL. |
| Interactive SQL |
Interactive SQL is a GUI tool that allows you to execute SQL statements, build scripts, and display data from SAP ASE. It is installed into theDBISQL-16_0 directory. |
| jutils-3_0Utilities |
A collection of SAP ASE utility programs including ribo, a tool to trace TDS traffic between a client program and SAP ASE. |
| SAP®jConnect™ for JDBC |
Installed into the jConnect-16_0 directory. Provides a Java Database Connectivity (JDBC) driver for SAP ASE. |
| OData Server |
Installed into the ODATA-16_0 directory, OData (Open Data Protocol) enables data services over RESTful HTTP, allowing you to perform operations through URIs (Universal Resource Identifiers) to access and modify information. |
Sybase ASE Database structure in detail
When installing SAP with Sybase ASE 15.7 we will get the following databases by default.
1) Master
2) Model
3) Tempdb
4) SID(User Specific Database)
5) Sybtempdb
6) Saptools
7) Sybmgmtdb
8) Sybsystemprocs
Each database must have at least one device nothing but datafile. Devise is nothing but a physical file or a device on Operating System Level.
Master, model and tempdb are by default stored in “master.dat” device.
The file path to “master.dat” file is à /sybase//sybsystem.
And the user specific database is created with datafile(data_1.dat) and logfile(log_1.dat) if you want you can increase the datafiles number as well as logfiles number.
Path to these files are à “/sybase//sapdata_1…” and
“/sybase//saplog_1…”
If you want you can increase the no.of datafiles or increase the size of the data files.
And the other db device files are à
datasaptools.dat
logsaptools.dat à these two stored in (“/sybase//sapdiag/”)
sybmgmtdb.dat
sybsysdb.dat
sysprocs.datà These three stored in (“/sybase//sybsystem” along with “master.dat”)
tempdadev.datà stored in (“/sybase//sybtemp”)
Master Database:-
Master database stores information on all user databases and their associated devices.
And it also stores information about database users, objects.
Sysdatabases(all databases on ASE)
Sysdevices(mounted devices)
Sysusages(storage space allocated to each DB),etc are important tables in master Database.
How to extend a device?
To extend a device we need to execute the following command
disk resize
name = logical_name_of_device
size = “value”
example:-
disk resize
name = data_1
size = “10G”
Then alter disk
Alter database <databasename> log on < logical_name_of_device> =”value”
eg:-Alter database SID log on data_1 =”10G”
The above command is used to increase the datafile data_1 to 10GB.
After increase the datafile (data_1) to take the changes effect to the database.we need to execute the following command.
Alter database data on data_1 10G.
To confirm the changes check with sp_helpdb
Database Backup & Restore
Dump database to “file Path”
Ex:-dump database ASB to “D:\backup\backup_SID.dmp”
dump database master to “D:\backup\backup_master.dmp”
The datafiles and logfiles of the database you specified are backed up with the dump command.
The backup log file are stored in file SID_BS.log in the folder “/sybase//ASE_0/install/_BS.log”
In the backup fail situations we can check this file for details.
For restore we can use the command,
Restore database from “backup_file”
Restore on same SID/diff SID :-
To Backup the database use the load command at the isql prompt
isql -Usapsa -S<SID> -X
then run the following command at the sql prompt
1>dump database <SID> to “d:\backup\backupxxx.dmp” with compression = “101”
2>go
=============
Following command we are tried for backup on tape drive.
1> use master
2> go
1>sp_config_dump @config_name=’SIDDB’,
2> @stripe_dir = ‘-i /dev/rmt0’ ,
3> @compression = ‘101’ ,
4> @verify = ‘header’
5> go
=============
To Restore the database use the load command at the isql prompt
1>load database from ‘d:\backup\xxxxx.dmp’
2>go
1>online database <DBSID>
2>go
SAP sybase iSql Command Prompt
========================================================================
Sp_helpdb
Sp_helpdevice
Sp_adddumpdevice
You can now start typing T-SQL commands and use the keyword “go” as a terminator.
isql -Usa -P -SSERVER
1> select @@version
2> go
We can log out by telling isql to disconnect using the exit command.
1> exit
We will make our new login default to an example database instead to avoid creating objects in the master database by mistake. So, we first set a password for sa by calling the stored procedure sp_passwordwith old and new passwords as parameters:
1> exec sp_password NULL, “Secr3t”
2> go
Password correctly set.
(return status = 0)
Now sa has a new password, changed from the old null default. We add a new login with sp_addlogin:
1> exec sp_addlogin “sybtest”, “SomePass”
2> go
Password correctly set.
Account unlocked.
New login created.
(return status = 0)
The isql command can also be used non-interactively to apply scripts of T-SQL to the server. One such script that is shipped with the server is installpubs2, located in the scripts directory. This is a very simple example database for a bookshop or a publishing house holding data about books, authors, publishers and so on. It is used in Sybase manuals and training courses and also in some SQL books. Microsoft SQL Server contains a similar database in addition to the Northwind example database they have added. In order to create the database, use the -i parameter to read the script in. Have a look at the file first so you understand the basics of what it is doing; it will create a database named pubs2 and several tables populated with data. It is time to execute the script. We’ll do this as sa who will also become the owner (dbo – database owner ) of the database. We redirect the output to a file we call errors.out. The -e parameter tells isql to also echo the T-SQL commands to the same file, giving more output but making it easier to match any errors to the commands causing them.
bash$ cd $SYBASE/$SYBASE_ASE/scripts
bash$ isql -Usa -PSecr3t -SSYBASE -iinstallpubs2 -e -oerrors.out
In order to allow our new login full privileges to this sample database we change ownership of the database to the new login. Here’s how we give the database away with sp_changedbowner:
isql -Usa -PSecr3t -SSYBASE
1> use pubs2
2> go
1> exec sp_changedbownersybtest
2> go
DBCC execution completed. If DBCC printed error messages, contact a user with
System Administrator (SA) role.
Database owner changed.
(return status = 0)
We can now log in interactively as our new user and check what has been installed.
1> exit
bash$ isql -Usybtest -PSomePass -SSYBASE
1> use pubs2
2> go
1>sp_help
2> go
[Lots of output deleted – the command displays all objects in the current database]
(Note that we don’t actually have to use “exec” to execute a stored procedure, the server will assume any non-keyword is a procedure.)
1> quit
One last command as the sa login in order to make life more convenient when we continue to use our new login – we make the new pubs2 database the default database.
1> exit
bash$ isql -Usa -PSecr3t -SSYBASE
1>sp_modifyloginsybtest, “defdb”, “pubs2”
2> go
Default database changed.
(return status = 0)
________________________________________
4.4. Stopping the Server
In order to stop the server in a controlled fashion, log in as sa and issue the shutdown command.
bash$ isql -Usa -PSecr3t -SSYBASE
1> shutdown
2> go
Server SHUTDOWN by request.
The SQL Server is terminating this process.
CT-LIBRARY error:
ct_results(): network packet layer: internal net library error: Net-Library operation terminated due to disconnect
You will immediately be disconnected and a message is printed by isql to warn you of this fact. You can check the error log for a message about the server being shutdown and you can verify that the process is no longer running with showserver.
4.5. Maintenance
One of the most important aspects of being a database administrator may be the backup. The I/O load of a relational database means little rest for the hard drives and once a drive fails the database is in need of serious disaster recovery. Even a mistyped command may result in the need to revert to a previous backup generation. For this purpose, a separate server application called the Backup Server is used. It is by default named the same as your server with an extension of BCK. Start it with startserver -f RUN_SYBASE_BCK. Certain commands typed into the isqlpropmt will be forwarded from thedataserver process to the backupserver process, which will then proceed with the actual backup (in Sybase terminology, this is a database dump) while processing in the database continues unaffected. You should schedule database dumps (usually via cron) to run at low activity hours. A typical full database bacup is simply done like this:
isql -Usa -PSecr3t -SSYBASE
1> dump database pubs2 to “/mnt/backup/pubs2.bkp”
2> go
Backup Server session id is: 8. Use this value when executing the
‘sp_volchanged’ system stored procedure after fulfilling any volume change
request from the Backup Server.
Backup Server: 4.41.1.1: Creating new disk file /mnt/backup/pubs2.bkp.
Backup Server: 6.28.1.1: Dumpfile name ‘pubs2011710275E ‘ section number 1
mounted on disk file ‘/mnt/backup/pubs2.bkp’
You can restore this back into your database using the load database command.
As time passes while users are doing modifications in the database, adding, deleting or changing data, all operations are being written to the transaction log. This keeps track of changes so they can be undone by an implicit or explicit rollback, or for the undo/redo phases of revocery at startup. This transaction log should normally be placed on a device of its own for several reasons, but a small test database can be created on a single mixed log and data device.
Apart from the performance benefits of spreading I/O, one reason for keeping the log and data separate is for recovery purposes. You can at regular intervals, depending upon your recovery needs, dump this log of changes to the database. Together with the full database dump, this transaction log dump now constitute an incremental backup. Should a restore become necessary, you can load the database dump, then load all subsequent transaction log dumps. There is even an “until_time” option to the load command enabling you to specify the exact time you want to restore until, abandoning any mistakes done after that time. Dumping the log is done with a similar syntax:
isql -Usa -PSecr3t -SSYBASE
1> dump transaction database to “/mnt/backup/dbtrandump2003_08_27_T23_32.bkp”
2> go
Note that we could not do this with pubs2 as it was not created with a separate log fragment.
Unless you keep dumping the transaction log, it will just keep growing until it fills up it’s space and starts reporting error 1105. Users will be suspended and appear to be hanging while the situation remains unresolved. Dump the transaction log to file or tape, or simply truncate it if you don’t use incremental backups.
isql -Usa -PSecr3t -SSYBASE
1> dump transaction pubs2 with truncate_only
2> go
1>
Other maintenance commands you should read up on are
• DBCC, the DataBase Consistency Checker which will verify that the physical integrity of the data structures on the ASE devices are OK.
• update statistics, which will make sure that ASE has a correct view of how your data is distributed in your tables, enabling it to make the best decisions of how to retrieve the data in the shortest possible time.
5. ASE Architecture: Observing the Server
5.1. Processes
A simple ps will show you the dataserver processes (by default you only have one), Sybase has provided a utility named showserver that will just show you the Sybase-related processes that are active. Thesp_sysmon stored procedure will monitor ASE for a given time interval, then dump out several pages of global performance data. The Engine section shows how active the server really is, regardless of the CPU usage shown on OS level.
5.2. Physical Storage
The ASE server does I/O to the raw devices or files, these are represented internally as virtual devices. A database can reside on one or spread out on many of these virtual devices, and a virtual device can hold many databases if you want. You should locate the OS-level device files on fast disks and make sure they are not removed or messed with by other applications or sysadmins on a cleanup crusade. The path to the virtual devices are stored in the master..sysdevices table, you can list these with the sp_helpdevice stored procedure.
5.3. Network
The server listens for incoming connections on one or several TCP ports. You identify the server by the logical Sybase server name when you connect. This logical name is listed in the interfaces file, used by both ASE server and clients such as isql. When the ASE server is started, it finds it’s name in the RUN_SERVER file, looks this up in the interfaces file, finds the master entry and starts a listener on the IP / port found there. When you start isql it also looks for the logical server name in the interfaces file, but looks for the query line instead. Normally this is the same IP and port, but it gives you the option of starting the server on several different IPs and ports and configure clients in different parts of the network to utilize different pathways to the server. JDBC does not use the interfaces file, but instead lets you use the IP and port as part of the URL.
You can observe the open port and established connections with netstat or lsof -i. It is also possible to trace the communication using tcpdump or Ethereal, these utilities have support for the Tabular Data Stream (TDS) protocol used in Sybase client-server connections.
Once a client has connected it will be visible inside ASE as a task, an internal process. These are not seen as separate OS processes, but can be listed with the sp_who stored procedure.
5.4. Memory
You can configure how much memory you want ASE to use down to a certain needed minimum and up to whatever your OS and your ASE version combination will allow you. Except for doing careful analysis and clever design and SQL writing, using more of the available memory is what makes databases speed up without changing hardware. By default, most of the memory you allow allocated to ASE is used for caching data to avoid disk I/O as much as possible. Another area of memory is used to cache stored procedures in a compiled form, enabling these to be readily re-used without having to read from disk as frequently. Smaller parts are reserved for various administrative memory structures needed by the server for keeping track of each user connection, each database and so on.
On OS level you can see this normally contiguous memory chunk with ipcs -m. Inside ASE you can usesp_configure to read and modify configuration parameters such as total memory. There are several ways of determining the efficiency of memory usage, this art is explained in the Performance and Tuning Guide.
You can use sp_errorlog to cause ASE to start logging to a new file, then archive or delete the original file.

