Connection Settings between ECC and PI system

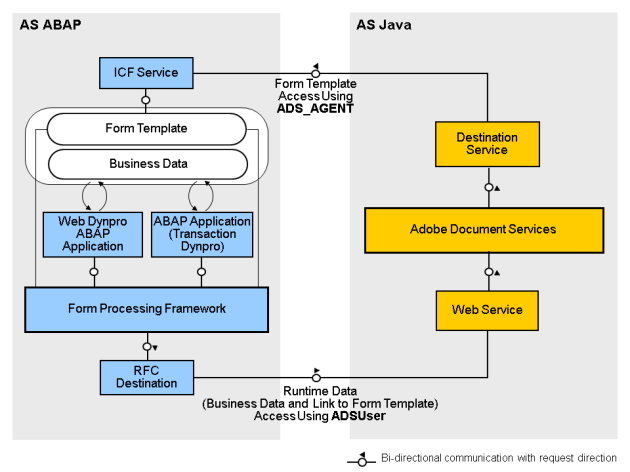
The purpose of this is to understand the basic settings required for any R/3-XI-MDM scenario. Also, while doing these settings I got some errors which I think worth mentioning in this blog.

What is ALE?
ALE is the technology introduced by SAP .ALE provides the mechanism for distributing SAP functionality and data across multiple systems. ALE allows us to distribute data between different systems and different business processes. The carrier of the message is the Intermediate Document (IDOC).

Pre-requisite:
–          The user must have all the required authorizations like SM59, WE21, and IDX1 etc.
–          Also, some of the software applications installed
SAP R/3, SAP PI (Process Integration)
Now, for the connection to be set up between the R/3 and XI few settings need to be done at both the side.

Steps:
 R/3 side
1.       Creating Logical Systems for Sender and Receiver systems (Tcode: BD54)

  1. Execute T code BD54.
  2. Click on New Entriesand create the logical systems for the sender and the receiver systems.

There is a one-to-many relationship between physical systems (or clients) and logical systems.   That is, we assign each client one logical system name, but several logical systems can point to the same client. 
                                                               
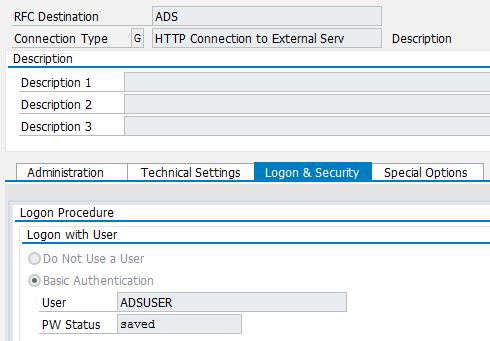
2.       Creating RFC Destination

  1. Execute T Code SM59.
  2. Create new RFC destination giving it a suitable name and the Connection Type as ABAP.
  3. Give the IP address of the PI system to be used and the system number.
  4. Give the Target Host name.
  5. In the Logon and Security tab, specify the Client that has to be logged in remotely and the Language. Also, give the User ID and the password and save them facilitate Remote Logon.
  6. Click on Connection Test and Remote Logon.

RFC destinations should “map” to the desired logical system. In fact, if the RFC destination has the same name as its corresponding logical system, configuration is easier because we can automatically generate the partner profiles.The RFC Destination should be correctly designed to avoid problems in the connection.
CAUTION: The names of RFC destinations are case-sensitive.

  1. Creating the port for the receiver
  2. Execute the T Code WE21.
  3. Create a port under transactional RFC; give it a suitable name and description.
  4. Select the RFC Destination created in the previous step and save it.

The system can automatically generate a transactional RFC port if the logical system name is the same as its corresponding RFC destination (between R/3 systems only!). You need to create ports manually for all other system types. Transactional RFC ports point to an RFC destination, which must exist before creating the port. tRFC ports merely function as a pointer to an RFC destination. We define the actual connection parameters in the RFC destination itself.

  1. Distributing the model
  2. Execute the T Code BD64.
  3. Create a new Model View, give it a suitable Technical name and enter the Short Text.
  4. Add the Message Types that are required by clicking on Add Message Type. Specify the Sender, Receiver while adding the MT.
  5. Save the Distribution Model.
  6. Go to Edit-> Model View and click on Distribute to distribute the created model.

If the required information in the model has been added correctly, then after clicking on Distribute, you will get a message as shown in the screenshot below:
“Model view ‘view name’ has been changed.”
I encounter the problem while distributing the model because of the following reasons:
–          The RFC Destination is not properly created.
–          In the partner profile message type SYNCH was missing

  1. Generating Partner Profile
  2. Execute the T Code WE20.
  3. Create new Partner Profile of type LS.
  4. Specify the outbound parameter for the receiving system and inbound parameters   if any.Also, the Type, Agent and the Language need to be selected.

Under most circumstances, SAP can use your distribution model to generate partner profiles for you automatically.
Tcode: BD82
Menu Path: BD64 ->Environment -Generate Partner profile
Restrictions on generation:
–          Each receiving logical system in the model must have an RFC destination defined with the same name as the logical system.
–          The receiving system will not generate a profile for any message received with a different receiving logical system name than is allocated to it.

PI side

  1. Creating RFC destination
    Here too the same steps have to be followed as in the case of RFC Destination in the ERP    system.
  2. Creating Port for Sender
    Again the same steps have to be followed as in the creation of port in the ERP system.
    While creating port in the XI system make sure that the port name should have the   format as SAP<SID>.
  3. Maintaining IDOC metadata
  4. Execute the T Code IDX2.
  5. Select the Port that you had created in the last step and click on Create.
  6. Enter the details of the IDoc metadata that you want to load (Type, Extension and the Source Port) and execute. If the metadata has been loaded, you will get the message “Metadata loaded successfully”.
    Please see to it that you enter the correct source port and correct basic type of the IDOC, otherwise the metadata will not be loaded and you will get the error as “The Basic Type is unknown.”
Ref:https://wiki.scn.sap.com/wiki/display/XI/Connection+Settings+between+ECC+and+PI+system

ADS Configuration in Netweaver 7.4

Use

Adobe Document Services (ADS) are an SAP NetWeaver solution extension included in the SAP NetWeaver usage type Application Server (AS) Java. To process forms in an ABAP environment , the ABAP transaction dynpros or Web Dynpro ABAP applications call the ADS. The generation of forms is based on form templates designed with Adobe LiveCycle Designer and business data provided by the applications.

Once installed on the AS Java, the ADS need to be configured in order to be available for form processing.

Communication Between AS ABAP and ADS

The ADS can run either on the same server as the ABAP applications or on a separate server. The ADS can also be installed on the AS Java as a central component – an ADS hub – which can operate with different ABAP systems. The graphic below shows the communication paths between the components on the AS ABAP and the ADS installed on the AS Java.

1

The form processing framework (ABAP) sends the runtime data (business data provided by an application and a link to the form template) to the ADS by using the RFC destination. The system user ADSUser is required to access the ADS.

Before processing the form and creating a PDF or PCL file, the ADS call the form template. To establish the required connection to the AS ABAP where the form template is stored, the destination service used by the ADS communicates with an Internet Communication Framework (ICF) service. The service user required to access the template repository is ADS_AGENT.

If forms bundling is used, two separate ICF services are used to retrieve the form template and the business data and to return the result.

The protocol for the communication paths is HTTP, using the default HTTP port. For SSL, the protocol is HTTPS or HTTPS-Port.

There are 2 types of ADS Configuration-

1) Basic Authentication
2) SSL Authentication.

Here, I am discussing ADS Configuration using Basic Authentication for interactive Adobe Forms.

Prerequisites

1) SAP Netweaver 7.3 As Java System (ADS should be installed).
2) SAP Business Suite 7 System

Profile Parameters

1) Profile Parameter SAPFQDN should be set in both As Java and As ABAP system.

Process

1. Users creation

If UME on AS Java

In Identity Management http://hostname:port/useradmin

– Add action “AdobeDocumentServices (ADSCaller)” to role SAP_ADSCALLER
– Create ADSCALLERS group and assign role SAP_ADSCALLER
– Create ADSUSER, select Security Policy “Technical User” and assign group ADSCALLERS

Log on to the AS ABAP with an admin user, in the client that is used for the ADS configuration and go to transaction SU01:

– Create user ADSUSER and select user type “System”
– Create user ADS_AGENT, select user type “System” and assign roles SAP_BC_FP_ICF,SAP_BC_FPADS_ICF and SAP_BC_JSF_COMMUNICATION

Important: profile of these roles must be generated.

Go to transaction PFCG:

Create a role ADSCALLERS (no authorizations required) and assign user ADSUSER to it.

If UME on AS ABAP

Log on to the AS ABAP with an admin user, in the client that is used for the UME authentication and go to transaction SU01:

– Create user ADSUSER and select user type “System”
– Create user ADS_AGENT, select user type “System” and assign roles SAP_BC_FP_ICF, SAP_BC_FPADS_ICF and SAP_BC_JSF_COMMUNICATION

Important: profile of these roles must be generated.

Go to transaction PFCG:

Create a role ADSCALLERS (no authorizations required) and assign user ADSUSER to it.

In Identity Management http://hostname:port/useradmin

– Add action “AdobeDocumentServices (ADSCaller)” to role SAP_ADSCALLER
– Add ADSUSER to role SAP_ADSCALLER
– Make sure that the ADSUSER is “Technical User” and added to group ADSCALLERS

2. AS Java configuration

2.1 Web service destination

Start the SAP NetWeaver Administrator via the address http://hostname:port/nwa

Choose SOA Next navigation step Technical Configuration Next navigation step Destination Template Management

Choose New

1

Choose Destination Type WSIL

Enter ConfigPort_Document as Destination Name

Enter URL http://hostname:port/inspection.wsil (hostname is the AS Java hostname in which the Adobe Document Services are installed and port is the HTTP port of the AS Java)

Choose Next

1

Choose Authentication HTTP Authentication and select UserID/Password (Basic)

Enter User ID adsuser (with the password that you created)

Then choose Finish to saveNow, destination ConfigPort_Document will be created.

1

Note: If you are configuring Interactive Adobe Forms then first request SAP to provide Adobe Interactive form credentials and *.pfx file which you need to configure Reader Right credentials. In order to obtain Reader Right credentials then please follow SAP note 736902.

3) In order to install Reader Right credentials, go to nwa (http://<server&gt;:<port>/nwa).

Go to Configuration –> Infrastructure –> Adobe Document Services


1.png

Choose Document Security and then select Credentials.

2.png

Click on Manage P12 Files. A Pop-up will be open where you need to provide path of *.pfx file that you got from SAP.

Choose Upload. Now, your *.pfx file will be uploaded.
Click on Add New Object and a pop-up will be opened.
In Alias,Select Reader Rights

Type should be P12.

P12 File should be automatically filled as we have already uploaded the file in previous step.
Enter Password for P12 file.

3.png

Save this record

4

5) Restart the service Document Service Trust Manager Service and then the service PDF Manipulation Module for the changes to take effect.
In order to restart the service, go to Operations –> Systems –> Start & Stop.

Open Java Services Tab. In order to obtain list of services for ADS, filter the Service component Name column by Adobe. Restart the service

1

2.2 HTTP destination

Start the SAP NetWeaver Administrator via the address http://hostname:port/nwa

Choose SOA Next navigation step Technical Configuration Next navigation step Destinations

1

Choose Create…

2

Enter FP_ICF_DATA_<SID> as Destination Name (<SID> is the AS ABAP SID)
Choose Destination Type HTTP

Choose Next

3

Enter URL http://ABAPhostname:port (ABAPhostname is the AS ABAP hostname)

Enter the SID and productive client of your AS ABAP system

4

Choose Authentication Basic (User ID and Password)
Enter User Name ads_agent (with the password that you created)
Then choose Finish to save

5

2.3 Reader Rights Credential

If you want to create interactive forms, you need a Reader Rights Credential (usage rights credential). For more information please follow this link: Applying a Reader Rights Credential to PDF Forms – Configuring Adobe Document Services for Form Processing (ABAP) – SAP …

3. AS ABAP configuration

3.1 RFC

Call transaction SM59 Next navigation step Choose Create

Enter at least the following:

– RFC destination: ADS
– Connection type: G

– Target Host: Enter the host name of the J2EE Engine that runs the Adobe document services or of the SAP Web dispatcher if applicable

– Service No.: Enter the HTTP port number of the Target Host you have specified (The following naming convention applies: 5<J2EE_instance_number>00 (50000, for example, if your J2EE instance is 00)

– Path Prefix: /AdobeDocumentServices/Config?style=rpc

6

Choose the Logon/Security tab, select Basic Authentication

In the User and Password boxes, enter the user name ADSUSER and the password

Save your settings

7

3.2 Activating the ICF services

Call transaction SICF Next navigation step Activate the following services:
default_host → sap → bc → fp
default_host → sap → bc → fpads

4. Configuration check and Troubleshooting

Call transaction SA38 and execute the program FP_TEST_00.
If the FP_TEST_00 form is displayed in the print preview, the ADS configuration is correct.
Call transaction SA38 and execute the program FP_PDF_TEST_00.
This enables you to check the RFC connection to ADS.
If the system displays the version number of ADS, the configuration of the RFC connection is correct.
Call transaction SA38 and execute the program FP_CHECK_DESTINATION_SERVICE without and with selecting the option “With Destination Service”.

If the file size of the generated PDF is displayed the ADS configuration is correct.
If you get this error message:

SYSTEM ERROR: ADS: com.adobe.ProcessingException: com.adobe.ProcessingException: XMLFM Exception during render: com.adobe.ProcessingException(200.101).

Exception of class CX_FP_RUNTIME_INTERNAL please follow this link: ADS configuration error FP_CHECK_DESTINATION_SERVICE fails

If one of these reports does not work please refer to SAP Note 944221 for Adobe Document Services troubleshooting.


Source:https://blogs.sap.com/2016/09/07/ads-configuration-in-netweaver-74/